> For the complete documentation index, see [llms.txt](https://jheck.gitbook.io/hadoop/llms.txt). Markdown versions of documentation pages are available by appending `.md` to page URLs; this page is available as [Markdown](https://jheck.gitbook.io/hadoop/data_ingestion.md).
# Data ingestion
## Sqoop
In the previous lesson we learn about different type of storage repositories outside of HDFS.
Often, valuable data in an organization is stored in structured data stores such as relational database management systems (RDBMSs).
Apache Sqoop(which is a portmanteau for “sql-to-hadoop”) is an open source tool that allows users to extract data from a structured data store into Hadoop for further processing. This processing can be done with MapReduce programs or other higher-level tools such as Hive, Pig or Spark.
Sqoop can automatically create Hive tables from imported data from a RDBMS (Relational Database Management System) table.
Sqoop can also be used to send data from Hadoop to a relational database, useful for sending results processed in Hadoop to an operational transaction processing system.
Sqoop includes tools for the following operations:
* Listing databases and tables on a database system
* Importing a single table from a database system, including specifying which columns to import and specifying which rows to import using a WHERE clause
* Importing data from one or more tables using a SELECT statement
* Incremental imports from a table on a database system (importing only what has changed since a known previous state)
* Exporting of data from HDFS to a table on a remote database system
### Sqoop Connectors
Sqoop has an extension framework that makes it possible to import data from — and export data to — any external storage system that has bulk data transfer capabilities.
A Sqoop connector is a modular component that uses this framework to enable Sqoop imports and exports.
Sqoop ships with connectors for working with a range of popular databases, including MySQL, PostgreSQL, Oracle, SQL Server, DB2, and Netezza.
As well as the built-in Sqoop connectors, various third-party connectors are available for data stores, ranging from enterprise data warehouses (such as Teradata) to NoSQL stores (such as Couchbase).
There is also a generic JDBC (Java Database Connectivity) connector for connecting to any database that supports Java’s JDBC protocol.
```
# movielens DB must be created in MySQL using movielens.sql
sqoop import \
--connect jdbc:mysql://172.31.26.67:3306/movielens \
--table genres \
--username ubuntu \
--password ubuntu \
--target-dir /user/ubuntu/sqoop/movielens/genres
sqoop import \
--connect jdbc:mysql://172.31.26.67:3306/movielens \
--table genres
-m 2 \
--username ubuntu \
--password ubuntu \
--target-dir /user/ubuntu/sqoop/movielens/genres2
```
Sqoop is capable of importing into a few different file formats.
By default, Sqoop will generate comma-delimited text files for our imported data.Delimiters can be specified explicitly.
Sqoop also supports SequenceFiles, Avro datafiles, and Parquet files.
```
sqoop import \
--connect jdbc:mysql://172.31.26.67:3306/movielens \
--table genres \
-m 1 \
--username ubuntu \
--password ubuntu \
--target-dir /user/ubuntu/sqoop/movielens/genres3 \
--fields-terminated-by '\t' \
--enclosed-by '"'
sqoop import \
--connect jdbc:mysql://172.31.26.67:3306/movielens \
--table genres \
--columns "id, name" \
--where "id > 5" \
-m 1 \
--username ubuntu \
--password ubuntu \
--target-dir /user/ubuntu/sqoop/movielens/genres4
```
We can specify many more options when importing a Database using Sqoop, such as:
* \--fields-terminated-by
* \--lines-terminated-by
* \--null-non-string
* \--null-string "NA"
Create a new table in MySQL using the following steps:
```
mysql -u root -p
```
```
# Create table in movielens
use movielens;
CREATE TABLE users_replica AS select u.id, u.age, u.gender,
u.occupation_id, o.name as occupation
from users u LEFT JOIN occupations o
ON u.occupation_id = o.id;
select * from users_replica limit 10;
```
```
# Alter table
alter table users_replica add primary key (id);
alter table users_replica add column (salary int, generation varchar(100));
update users_replica set salary = 120000 where occupation = 'Lawyer';
update users_replica set salary = 100000 where occupation = 'Engineer';
update users_replica set salary = 80000 where occupation = 'Programmer';
update users_replica set salary = 0 where occupation = 'Student';
update users_replica set generation = 'Millenial' where age<35;
update users_replica set generation = 'Boomer' where age>55;
exit;
```
Then run the following Sqoop job:
```
sqoop import \
--connect jdbc:mysql://172.31.26.67:3306/movielens \
--username ubuntu \
--password ubuntu \
--table users_replica \
--target-dir /user/ubuntu/sqoop/movielens/users \
--fields-terminated-by '|' \
--lines-terminated-by '\n' \
-m 3 \
--where "id between 1 and 300" \
--null-non-string -1 \
--null-string "NA"
```
###
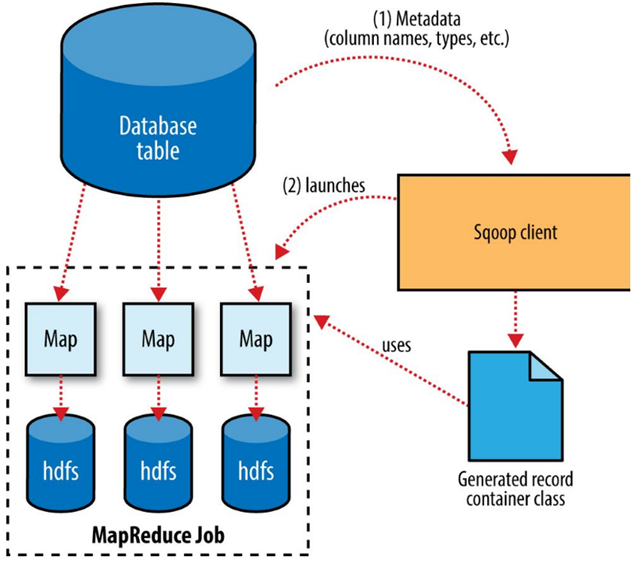
### How Sqoop works
Sqoop is an abstraction for MapReduce, meaning it takes a command, such as a request to import a table from an RDBMS into HDFS, and implements this using a MapReduce processing routine. Specifically, Sqoop implements a **Map-only** MapReduce process.
Sqoop performs the following steps to complete an import operation:
1. Connect to the database system using JDBC or a customer connector.
2. Examine the table to be imported.
3. Create a Java class to represent the structure (schema) for the specified table. This class can then be reused for future import operations.
4. Execute a Map-only MapReduce job with a specified number of tasks (mappers) to connect to the database system and import data from the specified table in parallel.
When importing data to HDFS, it is important that you ensure access to a consistent snapshot of the source data.
We need to ensure that any processes that update existing rows of a table are disabled during the import.
#### Imported Data and Hive
Using a system such as Hive to handle relational operations can dramatically ease the development of the analytic pipeline.
Sqoop can generate a Hive table based on a table from an existing relational data source.
```
## Create database movielens in Hive
#3 steps import into Hive:
# 1. import data to HDFS
sqoop import \
--connect jdbc:mysql://172.31.43.67:3306/movielens \
--table genres -m 1 \
--username ubuntu \
--password ubuntu \
--target-dir /user/ubuntu/sqoop/movielens/genres
# 2. create table in Hive
sqoop create-hive-table \
--connect jdbc:mysql://172.31.26.67:3306/movielens \
--table genres \
--hive-table movielens.genres \
--username ubuntu \
--password ubuntu \
--fields-terminated-by ','
```
```
# 3. import data from HDFS to Hive
#Run commands in Hive:
Hive
hive> show databases;
hive> use movielens;
hive> show tables;
hive> select * from genres;
hive> LOAD DATA INPATH "/user/ubuntu/sqoop/movielens/genres" OVERWRITE INTO TABLE genres;
hive> select * from genres;
hive> exit;
```
```
#run commands in Terminal
hadoop fs -ls /user/ubuntu/sqoop/movielens/genres
hadoop fs -ls /user/hive/warehouse/movielens.db/genres
hadoop fs -cat /user/hive/warehouse/movielens.db/genres/part-m-00000
```
```
# Direct import into Hive
sqoop import \
--connect jdbc:mysql://172.31.26.67:3306/movielens \
--table genres -m 1 \
--hive-import \
--hive-overwrite \
--hive-table movielens.genres2 \
--username ubuntu \
--password ubuntu \
--fields-terminated-by ','
```
```
#run commands in Terminal
hadoop fs -ls /user/hive/warehouse/movielens.db/genres
hadoop fs -cat /user/hive/warehouse/movielens.db/genres/part-m-00000
```
#### Sqoop Export
In Sqoop, an **import** refers to the movement of data from a database system into HDFS. By contrast, an **export** uses HDFS as the source of data and a remote database as the destination. We can, for example, export the results of an analysis to a database for consumption by other tools.
Before exporting a table from HDFS to a database, we must prepare the database to receive the data by creating the target table. Although Sqoop can infer which Java types are appropriate to hold SQL data types, this translation does not work in both directions. You must determine which types are most appropriate.
When reading the tables directly from files, we need to tell Sqoop which delimiters to use. Sqoop assumes records are newline-delimited by default, but needs to be told about the field delimiters.
```
# Create table in MySQL
mysql -u ubuntu -p
mysql> use movielens;
mysql> create table genres_export (id INT, name VARCHAR(255));
mysql> exit;
```
```
# Export data from hive warehouse to mysql
sqoop export \
--connect jdbc:mysql://172.31.26.67:3306/movielens -m 1 \
--table genres_export \
--export-dir /user/hive/warehouse/movielens.db/genres \
--username ubuntu \
--password ubuntu
```
```
# Check the exported table in mysql
mysql -u root -p
use movielens;
show tables;
select * from enres_export limit 10;
```
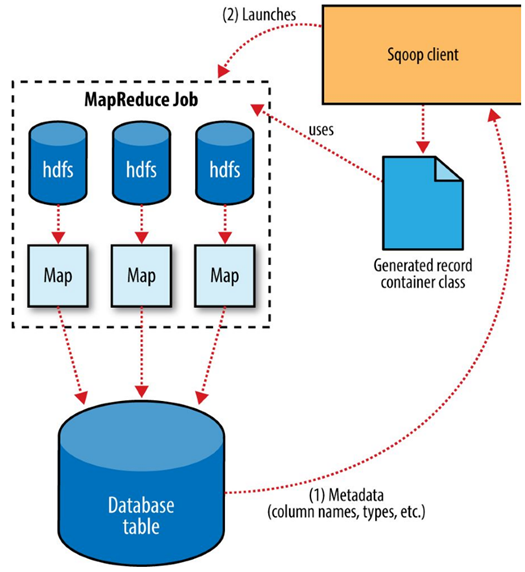
The Sqoop performs exports is very similar in nature to how Sqoop performs imports. Before performing the export, Sqoop picks a strategy based on the database connect string.
Sqoop then generates a Java class based on the target table definition. This generated class has the ability to parse records from text files and insert values of the appropriate types into a table
A MapReduce job is then launched that reads the source datafiles from HDFS, parses the records using the generated class, and executes the chosen export strategy.
## Exercise Sqoop
### Install crime-data-la database in MySQL
Copy datasets **crime\_data\_la.csv** and **crime\_data\_area\_name.csv**in **/user/ubuntu/crime\_la** in HDFS.
From the console, copy **crime\_data\_la.csv** and **crime\_data\_area\_name.csv** to the local filesystem using:
```
hadoop fs -copyToLocal /user/ubuntu/crime_la/crime_data_la.csv
hadoop fs -copyToLocal /user/ubuntu/crime_la/crime_data_area_name.csv
ls -a
```
Create a new database **crime\_la** in MySQL
```
mysql -u root -p
CREATE DATABASE crime_la;
USE crime_la;
```
Create table **crime\_data\_la** and **area\_lookup**:
```
CREATE TABLE crime_data_la
(dr_number INT, date_reported VARCHAR(255), date_occured VARCHAR(255),
tm_occured INT, area_id INT, reporting_district INT, crime_code INT, victime_age INT,
victim_sex VARCHAR(255), victim_descent VARCHAR(255), coord_lat FLOAT, coord_long FLOAT);
alter table crime_data_la add primary key (dr_number);
CREATE TABLE area_lookup (area_id INT, area_name VARCHAR(255));
alter table area_lookup add primary key (area_id);
```
Load data into crime\_la database:
```
LOAD DATA LOCAL INFILE 'crime_data_la.csv'
INTO TABLE crime_data_la
FIELDS TERMINATED BY ','
OPTIONALLY ENCLOSED BY '"'
LINES TERMINATED BY '\r\n'
(dr_number, date_reported, date_occured,tm_occured,area_id, reporting_district, crime_code, victime_age,
victim_sex, victim_descent, coord_lat, coord_long);
```
```
LOAD DATA LOCAL INFILE 'crime_data_area_name.csv'
INTO TABLE area_lookup
FIELDS TERMINATED BY ','
ENCLOSED BY '"'
LINES TERMINATED BY '\n'
(area_id, area_name);
```
Check the data has been correctly loaded:
```
SELECT * FROM crime_data_la LIMIT 10;
SELECT * FROM area_lookup;
```
Grant all privileges on crime\_la
```
GRANT ALL PRIVILEGES
ON crime_la.*
TO 'ubuntu'@'%'
IDENTIFIED BY 'ubuntu';
```
###
### Exercise 1
* Create the crime\_la database in MySQL using the course material.
* Using sqoop, import crime\_data\_la table from MySQL into HDFS such that fields are separated by a ‘\*' and lines are separated by '\n'.
* Null values are represented as -1 for numbers and "NA" for strings.
* Only records with date\_reported between 2013-01-15 and 2014-05-27 should be imported.
* Compare date strings using CAST('date\_string' AS DATE) or str\_to\_date( 'date\_string' , '%Y-%m-%d’). Either way works.
```
CAST(date_reported AS DATE)
CAST('2015-05-27' AS DATE)
str_to_date(date_reported,'%Y-%m-%d')
str_to_date('2015-05-27','%Y-%m-%d')
```
* Use 3 mappers for importing.
* The destination file should be stored as a text file to directory /user/ubuntu/crime\_la/export.
### Exercise 2
* Create the crime\_la database in Hive (i.e. in HUE).
* Using sqoop, import area\_lookup table from MySQL into crime\_la Hive database such that fields are separated by a '|' and lines are separated by '\n'.
* Only records with area\_id between 5 and 20 should be imported.
* Use 2 mappers for importing.
* Overwrite the table if it already exists.
## Flume
### Introduction to Flume
Apache Flume is a Hadoop ecosystem project originally developed by Cloudera designed to capture, transform, and ingest data into HDFS using one or more agents.
Apache Flume is an ideal fit for streams of data that we would like to aggregate, store, and analyze using Hadoop.
Flume is designed for high-volume ingestion into Hadoop of event-based data.
The initial use case was based upon capturing log files, or web logs, from a source system like a web server, and routing these files and their messages into HDFS as they are generated.
The usual destination (or sink in Flume parlance) is HDFS. However, Flume is flexible enough to write to other systems, like HBase or Solr.
�
### Flume Agents
To use Flume, we need to run a **Flume agent**, which is a long-lived Java process that runs **sources** and **sinks**, connected by **channels**.
Agents can connect a data source directly to HDFS or to other downstream agents.
Agents can also perform in-flight data operations, including basic transformations, compression, encryption, batching of events and more.
A Flume installation is made up of a collection of connected agents running in a distributed topology.
Agents on the edge of the system (co-located on web server machines, for example) collect data and forward it to agents that are responsible for aggregating and then storing the data in its final destination.
Agents are configured to run a collection of particular sources and sinks, so using Flume is mainly a configuration exercise in wiring the pieces together.
####
A Flume agent **source** instructs the agent where the data is to be received from.
A Flume agent **sink** tells the agent where to send data.
* Often the destination is HDFS, which was the original intention for the project.
* However, the destination could be another agent that will do some further in-flight processing, or another filesystem such as S3.
The Flume agent **channel** is a queue between the agent’s source and sink.
* Flume implements a transactional architecture for added reliability. This enables rollback and retry operations if required.
A source in Flume produces events and delivers them to the channel, which stores the events until they are forwarded to the sink.
You can think of the source-channel-sink combination as a basic Flume building block.
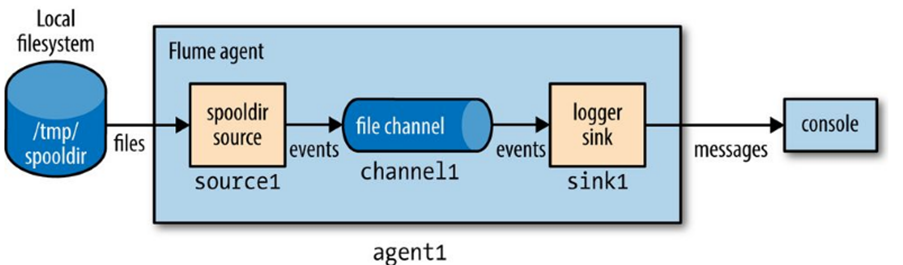
### Flume Agent example
```
# Flume Components
agent1.sources = source1
agent1.sinks = sink1
agent1.channels = channel1
# Source
agent1.sources.source1.type = exec
agent1.sources.source1.command = tail -f logfile.log
agent1.sources.source1.channels = channel1
# Sink
agent1.sinks.sink1.type = logger
agent1.sinks.sink1.channel = channel1
# Channel
agent1.channels.channel1.type = memory
```
### HDFS Sink
The point of Flume is to deliver large amounts of data into a Hadoop data store, so let’s look at how to configure a Flume agent to deliver events to an **HDFS sink**.
The only two settings that are required are the sink’s type (**hdfs**) and **hdfs.path**.
```
# Flume Components
agent1.sources = source1
agent1.sinks = sink1
agent1.channels = channel1
# Source
agent1.sources.source1.type = exec
agent1.sources.source1.command = tail -f logfile.log
agent1.sources.source1.channels = channel1
# Sink
agent1.sinks.sink1.type = hdfs
agent1.sinks.sink1.hdfs.path = flume/simple
agent1.sinks.sink1.hdfs.fileType = DataStream
agent1.sinks.sink1.channel = channel1
# Channel
agent1.channels.channel1.type = memory
```
```
# Flume Components
agent1.sources = source1
agent1.sinks = sink1
agent1.channels = channel1
# Source
agent1.sources.source1.type = exec
agent1.sources.source1.command = tail -f logfile.log
agent1.sources.source1.channels = channel1
# Sink
agent1.sinks.sink1.type = hdfs
agent1.sinks.sink1.hdfs.path = flume/simple
agent1.sinks.sink1.hdfs.fileType = DataStream
agent1.sinks.sink1.hdfs.filePrefix = events
agent1.sinks.sink1.hdfs.fileSuffix = .log
agent1.sinks.sink1.channel = channel1
# Channel
agent1.channels.channel1.type = memory
```
### Fan Out
**Fan out** is the term for delivering events from one source to multiple channels, so they reach multiple sinks.
The below configuration delivers events to both an HDFS sink (**sink1a**via **channel1a**) and a logger sink (**sink1b** via **channel1b**).

```
# Flume Components
agent1.sources = tail-source
agent1.sinks = local-sink hdfs-sink
agent1.channels = local-memory-channel hdfs-memory-channel
# Channels
agent1.channels.local-memory-channel.type = memory
agent1.channels.hdfs-memory-channel.type = memory
# Source
agent1.sources.tail-source.type = exec
agent1.sources.tail-source.command = tail -F logfile.log
agent1.sources.tail-source.channels = local-memory-channel hdfs-memory-channel
# Define a sink that outputs to local file.
agent1.sinks.local-sink.type = file_roll
agent1.sinks.local-sink.sink.directory = flume/replicate
agent1.sinks.local-sink.sink.rollInterval = 90
agent1.sinks.local-sink.channel = local-memory-channel
# Define a sink that outputs to hdfs.
agent1.sinks.hdfs-sink.type = hdfs
agent1.sinks.hdfs-sink.hdfs.path = flume/replicate
agent1.sinks.hdfs-sink.hdfs.fileType = DataStream
agent1.sinks.hdfs-sink.hdfs.rollCount = 5
agent1.sinks.hdfs-sink.hdfs.inUseSuffix = .tmp
agent1.sinks.hdfs-sink.channel = hdfs-memory-channel
```
### Agent Tiers
If there is one agent running on every node producing raw data, then with the setup described so far, at any particular time each file being written to HDFS will consist entirely of the events from one node.
It would be better if we could aggregate the events from a group of nodes in a single file, since this would result in fewer, larger files.
Aggregating Flume events is achieved by having **tiers** of Flume agents. The first tier collects events from the original sources (such as web servers) and sends them to a smaller set of agents in the second tier, which aggregate events from the first tier before writing them to HDFS.
Tiers are constructed by using a special sink that sends events over the network, and a corresponding source that receives events.
The Avro sink sends events over Avro RPC (Remote Procedure Call) to an Avro source running in another Flume agent.
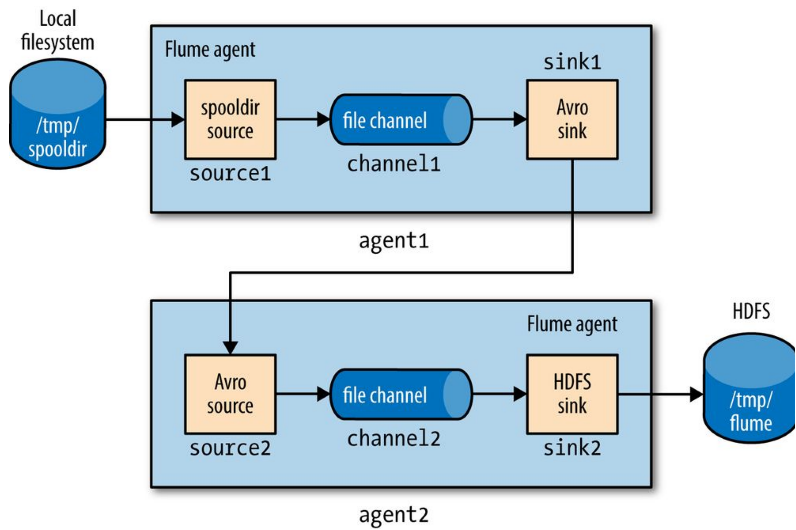
```
## First-tier agent
# Flume Components
agent1.sources = source1
agent1.sinks = sink1
agent1.channels = channel1
# Source
agent1.sources.source1.type = exec
agent1.sources.source1.command = tail -F logfile.log
agent1.sources.source1.channels = channel1
# Define a sink that outputs to a source.
agent1.sinks.sink1.channel = channel1
agent1.sinks.sink1.type = avro
agent1.sinks.sink1.hostname = 172.31.43.67
agent1.sinks.sink1.port = 14000
# Channels
agent1.channels.channel1.type = memory
```
```
## Second-tier agent
# Flume Components
agent2.sources = source2
agent2.sinks = sink2
agent2.channels = channel2
# Source as a sink
agent2.sources.source2.channels = channel2
agent2.sources.source2.type = avro
agent2.sources.source2.bind = 172.31.43.67
agent2.sources.source2.port = 14000
# Sink
agent2.sinks.sink2.type = hdfs
agent2.sinks.sink2.hdfs.path = flume/agent_tiers
agent2.sinks.sink2.hdfs.fileType = DataStream
agent2.sinks.sink2.hdfs.filePrefix = events
agent2.sinks.sink2.hdfs.fileSuffix = .log
agent2.sinks.sink2.channel = channel2
# Channel
agent2.channels.channel2.type = memory
```