# HDFS and MapReduce
## HDFS
### Why HDFS?
Big Data usually outgrows the storage capacity of a single physical machine. It becomes necessary to partition the data across a network of machines, or cluster. Hence we need a file system that manage the storage across a network of machines. Such file systems are called distributed file systems.
Distributed file systems are more complex than regular disk file systems, since they are network based. One of the biggest challenges is to tolerate node failure without suffering data loss.
Hadoop comes with a distributed file system called **HDFS**, which stands for **Hadoop Distributed File system**.
### HDFS Design
HDFS was inspired by the GoogleFS whitepaper released in 2003. Google outlined how they were storing the large amount of data captured by their web crawlers.
There are several key design principles which require that the file system
* is scalable.
* is fault tolerant.
* uses commodity hardware.
* supports high concurrency.
HDFS appears to a client as if it is one system, but the underlying data is located in multiple different locations. HDFS gives a global view of your cluster. HDFS is immutable, meaning it has the inability to update data after it is committed to the file system.

### HDFS Drawbacks
HDFS does not work well for some applications, including:
* **Low-latency data access**: Applications that require low-latency access to data, in the tens of milliseconds range, will not work well with HDFS.
* **Lots of small files**: Because filesystem metadata is hold in memory, the limit to the number of files in a filesystem is governed by the amount of memory available. Each file, directory, and block takes about 150 bytes metadata in memory, e.g. one million files, each taking one block, would need at least 300 MB of memory.
* **Multiple writers**: Files in HDFS may be written to by a single writer. Writes are always made at the end of the file, in append-only fashion. There is no support for multiple writers or for modifications at arbitrary offsets in the file.
### HDFS Blocks
Like in a local filesystem (e.g. NTFS, EXT4), files in HDFS are broken into block-sized chunks, which are stored as independent units.
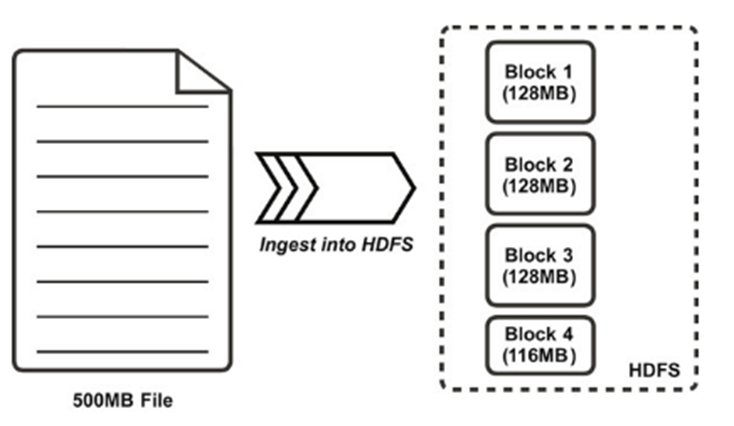
HDFS blocks are larger (128 MB by default) than single disk blocks to minimize the cost of seeks.
If a cluster contains more than one node, blocks are distributed among slave nodes.

Having a **block abstraction** for a distributed filesystem brings several benefits.
* There is nothing that requires the blocks from a file to be stored on the same disk, so a file can be larger than any single disk in the network.
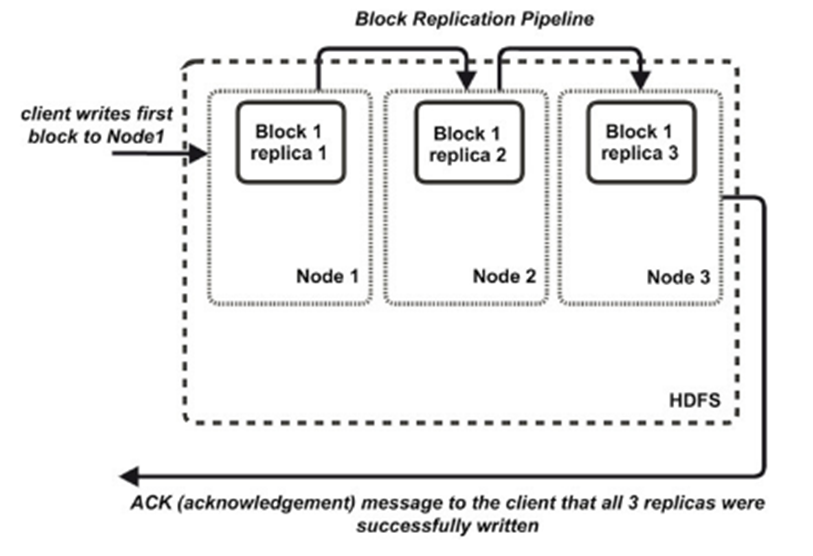
* Blocks fit well with **replication** for providing **fault tolerance** and **availability**. Each block is replicated to a small number of physically separate machines.
* By default HDFS replicates a block to 3 nodes.
### HDFS vs Local file system
HDFS by no means is a replacement for the local file system. The operating system still rely on the local file system. HDFS should still go through the local file system (typically ext4) to save the blocks in the storage. HDFS is spread across all the nodes in the cluster and it has a distributed view of the cluster. The local file system does not have a distributed view and only has a local view.
### Namenode
The NameNode’s most important function is management of the filesystem’s metadata.
HDFS metadata is the filesystem catalog, which contains all of the directory and file objects and their related properties and attributes.
NameNode’s in-memory representation of the metadata includes the locations of the blocks which comprise files in HDFS.
* This is the only stateful representation of the relationship between files and blocks in HDFS.
* If the machine hosting the NameNode fails all the files on the filesystem would be lost.
* The NameNode must be resilient to failure.
#### Namenode Metadata
The NameNode’s metadata is perhaps the single most critical component in the HDFS architecture.
The metadata persists in resident memory on the NameNode to facilitate fast lookup operations for clients.
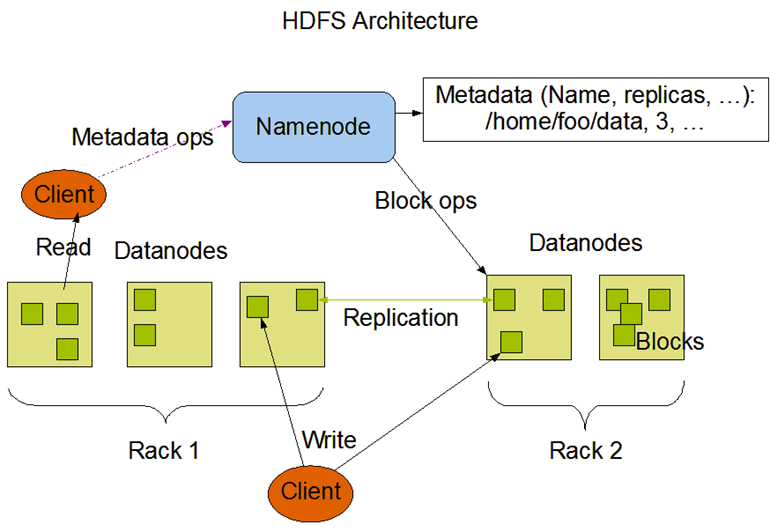
Common misconception: data does not flow through the NameNode.
The NameNode simply uses its metadata to direct clients where to read and write data.
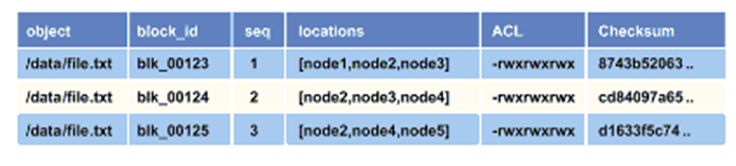
Think of the metadata as a giant lookup table, which includes HDFS blocks, the HDFS object (file or directory) they are associated with, and their sequence in the file.
### Datanodes
DataNodes are responsible for:
* storing and retrieving blocks when they are told to (by clients or the NameNode).
* participating in the block replication pipeline.
* managing local volumes and storage.
* providing block reports to the NameNode.
DataNodes store and manage physical HDFS blocks only, without having any knowledge of how these blocks are related to files and directories in the HDFS filesystem.
### HDFS Architecture
## Demo HDFS
### Local filesystem vs HDFS
HDFS and Linux commands have a lot in common. If you are familiar with Linux commands, HDFS commands will be easy to grasp. We will see some of the well known commands to work with your local filesystem in linux and HDFS, such as ***mkdir*** to create a directory, ***cp*** to copy, ***ls*** to list the contents of a directory, etc.
If not already done, we first need to [connect to the main node of our cluster](https://juheck.gitbooks.io/connect-to-an-ec2-instance/content/).
All HDFS commands start with ***hadoop fs***. Regular ***ls*** command on root directory will bring the files from root directory in the local file sytem. ***hadoop fs -ls /*** list the files from the root directory in HDFS.
In the terminal, type in both commands and see what happens:
```
ls /
```
```
hadoop fs -ls /
```

While the normal ls command lists all directory and files from your local filesystem, HDFS gives an overview of the directory and files stored in the Hadoop cluster across all nodes.
Now let's download two files to the home directory in the local filesystem using the following commands:
```
wget https://s3-us-west-1.amazonaws.com/julienheck/hadoop/datasets/ml-100k/u.data
wget https://s3-us-west-1.amazonaws.com/julienheck/hadoop/datasets/ml-100k/u.item
```
Note that the home directory in your local file sytem will be ***/home/\*** whereas the home directory in HDFS will be ***/user/\***.
Since we are logged in as **ubuntu** user, the files will be saved under **/home/ubuntu** in the local filesystem.
Type ***ls*** to check the files have been downloaded successfully.

Let's connect to another node of our cluster while keeping our initial connection open. Type in the ***ls***commands again:
```
ls
hadoop fs -ls /
```
The **/home/ubuntu** directory is empty, there is no trace of the files we just downloaded on the local filesystem (of the first node). On the other hand, the output of the HDFS command is the same on both nodes.

No matter what nodes you are connected to in your cluster, the view of your HDFS filesystem will be exactly the same. HDFS gives a global overview of your cluster.
Let's go back to our first node and create a new directory in HDFS using the following command:
```
hadoop fs -mkdir myNewDir
```
Note that this new folder will be created in the home directory of the **ubuntu** user in HDFS (not in the local filesystem): ***/user/ubuntu***
We can check that the new directory has been created successfully with:
```
hadoop fs -ls
```

If we go back to the second node, we can see the newly created directory as well:

If we try to look for this newly created directory in our local filesystem (on either node), we won't be able to find it since this directory has been created in HDFS.
### Copying files to and from HDFS
To copy files from the local filesystem to HDFS, we can use ***copyFromLocal*** command and to copy files from HDFS to the local filesystem, we can use ***copyToLocal*** command.
```
hadoop fs -copyFromLocal
```
```
hadoop fs -copyToLocal
```
Let's connect to the node where we previously downloaded the **u.data** and **u.item** files in **/home/ubuntu** and copy the **u.data** file from the local filesystem to the new directory **myNewDir** in HDFS. In the terminal, type the following command (using relative path):
```
hadoop fs -copyFromLocal u.data myNewDir
```
or type this command (using absolute path):
```
hadoop fs -copyFromLocal /home/ubuntu/u.data /user/ubuntu/myNewDir
hadoop fs -ls myNewDir
```

The ***hadoop fs -copyToLocal*** command works in a similar way:
```
hadoop fs -copyToLocal myNewDir/u.data u.data.copy
ls
```

We can also use HDFS commands such as ***hadoop fs -cp*** or ***hadoop fs -mv*** to copy or move files within HDFS.
To copy a file:
```
hadoop fs -cp
```
To move a file:
```
hadoop fs -mv
```
For example, let's create 2 new directories in HDFS:
```
hadoop fs -mkdir myNewDir2
hadoop fs -mkdir myNewDir3
```
Copy the file **u.data** in **myNewDir** to **myNewDir2** using:
```
hadoop fs -cp myNewDir/u.data myNewDir2
hadoop fs -ls myNewDir2
```

Move the file **u.data** in **myNewDir** to **myNewDir3** using:
```
hadoop fs -mv myNewDir/u.data myNewDir3
hadoop fs -ls myNewDir
hadoop fs -ls myNewDir3
```

### Replication factor in HDFS
We have seen that HDFS supports block replication to provide fault tolerance and availability. By default HDFS replicates a block to 3 nodes.
Open the terminal, connect to the main node and list the content of the myNewDir2 directory using:
```
hadoop fs -ls myNewDir2
```

The number **3** after the right permissions is actually the replication factor for the file **u.data**. It means that each block of this file will be replicated 3 times in the cluster.
We can change the replication factor using the ***dfs.replication*** property. In the terminal, type in the following command:
```
hadoop fs -Ddfs.replication=2 -cp myNewDir2/u.data myNewDir/u.data.rep2
hadoop fs -ls myNewDir
```

### Block storage
When we copy a file to HDFS, the file is divided in to blocks and the blocks are stored in individual nodes. HDFS has a global view of the file eventhough the file is spread across the nodes in the cluster, whereas the local filesystem has local view of the blocks.
The **fsck** command gives us more information about block storage in the different nodes. We need root privileges to run this command.
First, let's download a large dataset and upload it into HDFS. Once connected to the main node of your cluster, type in the following commands into the Terminal:
```
wget https://s3-us-west-1.amazonaws.com/julienheck/hadoop/datasets/crime_data_la/Crime_Data_from_2010_to_Present.csv
hadoop fs -copyFromLocal Crime_Data_from_2010_to_Present.csv myNewDir
```

Now that our dataset has been uploaded into HDFS, we can run the following command in the Terminal:
```
sudo -u hdfs hdfs fsck /user/ubuntu/myNewDir/Crime_Data_from_2010_to_Present.csv -files -blocks -locations
```

We can see interesting information in here.
* **BP-521960221-172.31.35.231-1517967318079**: This is Block Pool ID. Block pool is a set of blocks that belong to single name space. For simplicity, you can say that all the blocks managed by a Name Node are under the same Block Pool
* The size of the file being 381 MB, it is divided into 3 blocks:
* **blk\_1073743228\_2413**
* **blk\_1073743229\_2414**
* **blk\_1073743230\_2415**
* **len**: Length of the block: Number of bytes in the block
* **Live\_repl=2** means there are 2 replicas for this block.
* **\[DatanodeInfoWithStorage\[172.31.14.147:50010,DS-6ac398a5-8621-4f60-bc93-5e61735a5505,DISK]**: This includes IP address of the Data Node holding this block.
### Delete files and directories
To clean up our /user/ubuntu directory in HDFS, we can use the following commands to recursively delete files and directories:
```
hadoop fs -rm myNewDir2/u.data
hadoop fs -rm -r myNewDir
hadoop fs -rm -r myNewDir2
hadoop fs -rm -r myNewDir3
```
## HDFS - Exercise
* List all the files and directories under **/user/ubuntu** in HDFS
* Create a directory with name **hdfsdemo** in HDFS
* Copy the file u.data.copy from **/home/ubuntu** (local file system) to **hdfsdemo** directory in HDFS
* Create a directory with name **hdfsdemo2** in HDFS
* Copy the file **u.data.copy** from **hdfsdemo** to **hdfsdemo2** directory in HDFS
* Check what is the **replication factor** of **u.data.copy** under **hdfsdemo** in HDFS?
* Set the **replication factor** of **u.data.copy** under **hdfsdemo** directory in HDFS to 2
* Bring the file **u.data.copy** under **hdfsdemo** directory in HDFS to the local file system
* Check the health of **hdfsdemo** directory in HDFS
* Recursively delete **hdfsdemo** and **hdfsdemo2** directories in HDFS
## MapReduce
**Hadoop MapReduce is a software framework for easily writing applications which process vast amounts of data (multi-terabyte data-sets) in-parallel on large clusters(thousands of nodes) of commodity hardware in a reliable,fault-tolerant manner – The Apache Software Foundation**
* MapReduce distributes the processing of data on the cluster.
* MapReduce works by breaking the processing into two phases: the **map** phase (transforming) and the **reduce** phase (aggregating).
* Each phase has **key-value pairs** as input and output, the types of which may be chosen by the programmer.
### Key-Value Pairs
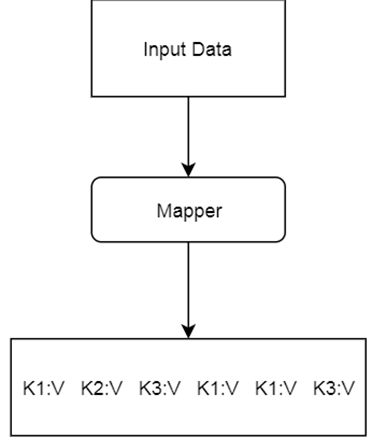
Input, output, and intermediate records in MapReduce are represented in the form of key-value pairs.
The key is an identifier; for instance, the name of the attribute. In MapReduce programming in Hadoop, the key is not required to be unique.
The value is the data that corresponds to the key. This value can be a simple, scalar value such as an integer, or a complex object such as a list of other objects.
Complex problems in Hadoop are often decompose into a series of operations against key-value pairs.

### Map phase
The Map phase is the initial phase of processing in which we will use an input dataset as a data source for processing.
The Map phase uses input format and record reader functions in its specific implementation to derive records in the form of key-value pairs for the input data.
The Map phase then applies one or several functions to each key-value pair over a portion of the dataset.
### Reduce phase
Each Reduce task (or Reducer) executes a reduce() function for each intermediate key and its list of associated intermediate values.
The output from each reduce() function is zero or more key-value pairs considered to be part of the final output.
This output may be the input to another Map phase in a complex multistage computational workflow.
### Shuffle and Sort
Between the Map phase and the Reduce phase, there is the **Shuffle and Sort** phase.
Intermediate data from completed Map tasks (keys and lists of values) is sent to the appropriate Reducer, depending upon the partitioning function specified.
The keys and their lists of values are then merged into one list of keys and their associated values per Reducer, with the keys stored in key-sorted order according the key datatype.
The Shuffle-and-Sort phase is the entire process of transferring intermediate data from Mappers to Reducers and merging the lists of key-value pairs into lists in key-sorted order on each Reducer.
### Reduce Tasks
Reduce tasks don’t have the advantage of data locality.The input to a single reduce task is normally the output from all mappers.
The sorted map outputs have to be transferred across the network to the node where the reduce task is running, where they are merged and then passed to the user-defined reduce function.
The output of the reduce is normally stored in HDFS for reliability.
For each HDFS block of the reduce output, the first replica is stored on the local node, with other replicas being stored on off-rack nodes for reliability (remember HDFS block replication).
Writing the reduce output does consume network bandwidth, but only as much as a normal HDFS write pipeline consumes.
**Data flow with a single reduce task**
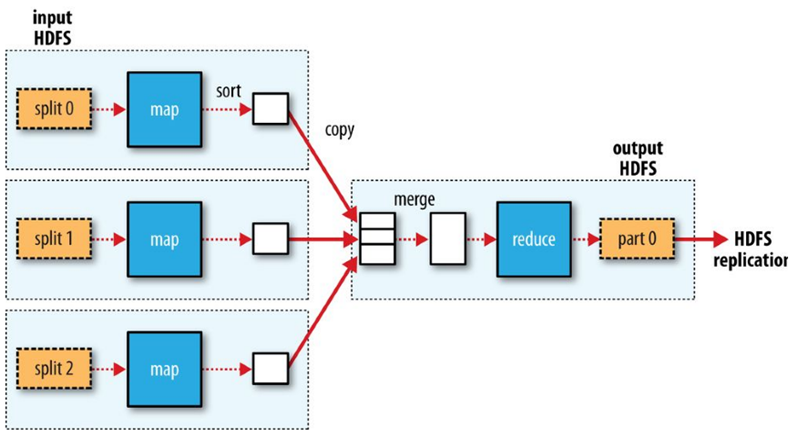
When there are multiple reducers, the map tasks partition their output, each creating one partition for each reduce task.
There can be many keys (and their associated values) in each partition, but the records for any given key are all in a single partition.
The partitioning can be controlled by a user-defined partitioning function.
Each reduce task is fed by many map tasks (“Shuffle” from the “Shuffle and Sort”).
**Data flow with multiple reduce tasks**

## MapReduce Example
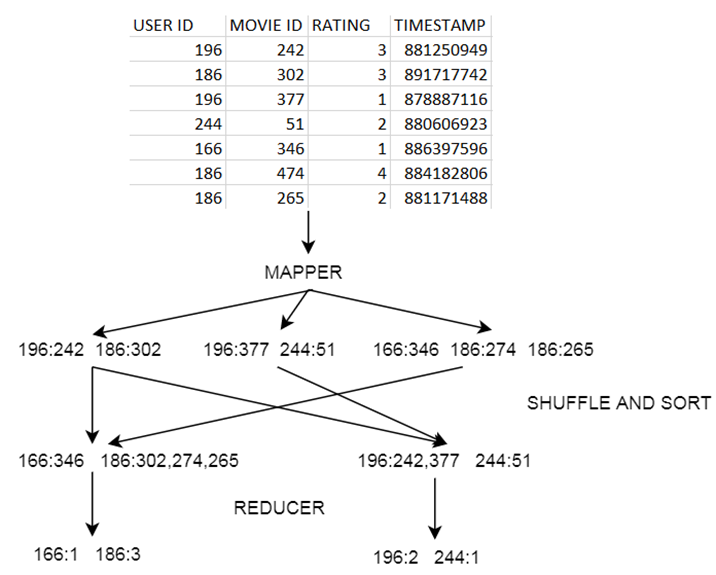
Let’s use the **MovieLens** dataset as an example and find out how many movies did each user rated.

The MAPPER converts raw source data into **key/value** pairs
This is how the **MovieLens u.data** looks like:

* Map **users** to movies they watched:
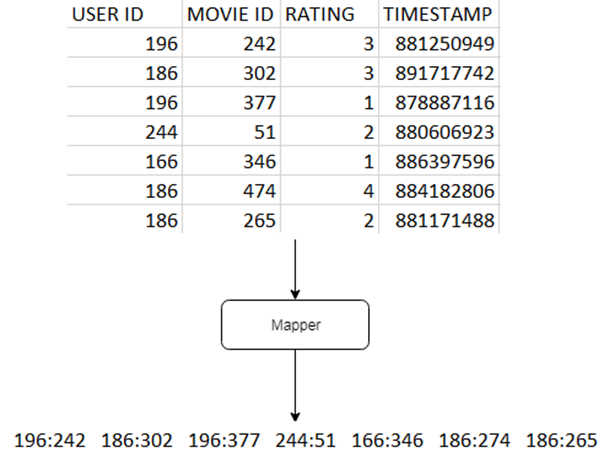
* Extract and organize data we care about.
* The less data we put on the cluster, the better.

* MapReduce sorts and groups the mapped data (“Shuffle and Sort”)
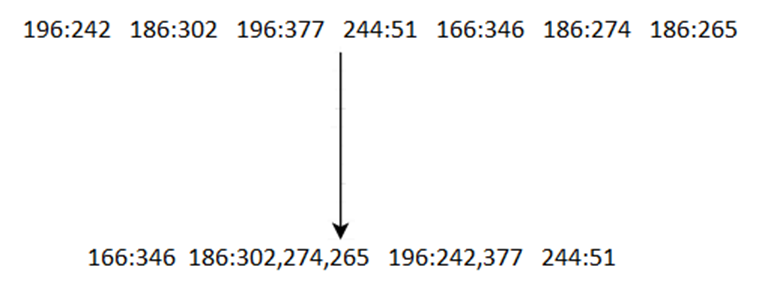
* The REDUCER Processes each key’s values
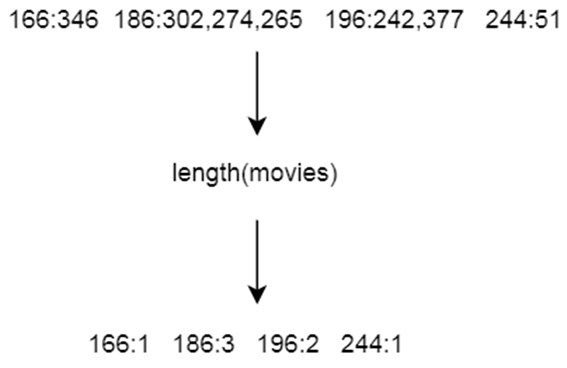
* To summarize:

* Example on a cluster:
## Demo MapReduce
Hadoop MapReduce is a software framework for easily writing applications which process vast amounts of data in-parallel on large clusters of commodity hardware in a reliable, fault-tolerant manner.
This tutorial is a step by step demo on how to run a Hadoop MapReduce job on a Hadoop cluster in AWS.
If not done already, we first need to [connect to the main node of our cluster](https://juheck.gitbooks.io/connect-to-an-ec2-instance/content/).
For this demo, we will use python and **mrjob**, a python package that helps you write and run Hadoop jobs. First let's install **pip** on our node. In the Terminal window, type in the following command:
```
sudo apt install python-pip
```
Once pip is installed, we can install the mrjob package using:
```
pip install mrjob
```
If not done already, we can download our dataset using the following command:
```
wget https://s3-us-west-1.amazonaws.com/julienheck/hadoop/2_hdfs_mapreduce/ml-100k/u.data
```
We also need to download our python script:
```
wget https://s3-us-west-1.amazonaws.com/julienheck/hadoop/2_hdfs_mapreduce/RatingsUsersMR.py
```
Before running the **mrjob** script on the cluster, we can first run it locally. This is good practice to first run your script locally on a smaller dataset for testing and debugging purposes before running it on the cluster .
To execute your mrjob script locally, the command will have the following form:
```
python
```
Which in this case will be:
```
python RatingsUsersMR.py u.data
```
If the execution has been successful, we can run the mrjob script on the cluster using the following command:
```
python RatingsUsersMR.py -r hadoop --hadoop-streaming-jar /opt/cloudera/parcels/CDH/lib/hadoop-mapreduce/hadoop-streaming.jar u.data --output-dir output
```
We specified the output directory with the parameter: ***--output-dir output***
We also need to manually specify where to find the hadoop-streaming.jar file with the parameter: ***--hadoop-streaming-jar /opt/cloudera/parcels/CDH/lib/hadoop-mapreduce/hadoop-streaming.jar***

You should now see progress in the terminal. Note that once submitted, the program is running in the cluster as an asynchronous distributed process.

Once the job is completed, we can see a summary and some metrics about the job that has been executed.

The output of our job is also showing in the Terminal.
We can also check the output of the job in our output directory in HDFS:
```
hadoop fs -ls output
```

Typically, a MapReduce job will write out data to a target directory in HDFS. In such case each Reduce task will write out its own output file, seen in the target HDFS directory as part-r-nnnnn, where nnnnn is the identifier for the Reducer. For instance, the first nominated Reducer would be 00000; therefore, the file written from this Reduce task would be named part-r-00000.
To inspect the content of each file, we can use:
```
hadoop fs -tail output/part-00000
hadoop fs -tail output/part-00001
```
We can also login to HUE and view the files in the File Browser. In a web browser, type in the URL:
```
http://server_host:8889
```
Which can be for example:
```
http://ec2-52-36-64-79.us-west-2.compute.amazonaws.com:8889
```
And enter login and password.
Click on "Files" in the "Browser" section of the main menu (upper left corner).


We can also view the job summary in a more user-friendly way than through the Terminal. On the upper right corner of the HUE window, click on "Jobs". We will see the list of jobs that ran for the user we are log in with (by default).

Click on the latest job of the list, and we should see the details about that specific job. We can see for example that this mapreduce job had 2 mappers and 2 reducers:

---
# Agent Instructions: Querying This Documentation
If you need additional information that is not directly available in this page, you can query the documentation dynamically by asking a question.
Perform an HTTP GET request on the current page URL with the `ask` query parameter:
```
GET https://jheck.gitbook.io/hadoop/hdfs-and-mapreduce.md?ask=
```
The question should be specific, self-contained, and written in natural language.
The response will contain a direct answer to the question and relevant excerpts and sources from the documentation.
Use this mechanism when the answer is not explicitly present in the current page, you need clarification or additional context, or you want to retrieve related documentation sections.